
Programing a DMR (Digital) Ham Radio Hot Spot
- jrock80
- Jul 23
- 4 min read
Problem Statement:
I recently discovered that using the NEDECN repeater, I was unable to connect to DMR talk groups in California. I deduced that there was a limit to the chat groups being supported since I could not connect to any of the California talk groups. I found the following statement when researching why I could not connect to California talk groups.
“The New England Digital Emergency Communications Network (NEDECN) and California DMR systems are largely incompatible because they operate on entirely separate, non-bridged digital network backbones (DMR-MARC vs. BrandMeister). Furthermore, New England repeaters statically fix their talk groups, preventing California hams from dynamically routing their groups over the internet.”
The Solution:
All my online research, help from N1WSD and NV1W, indicated the only solution was a hotspot/bridge. I purchased a Radioddity rhs-h1 mmdvm hotspot which is built on a Raspberry Pi Zero W board.
"MMDVM hotspots support various digital radio modes, including DMR, D-STAR, YSF, NXDN, and P25, allowing users to connect and communicate over the internet. This expands their coverage without the need for local repeaters, enhancing flexibility and reach."
Setup/Configuration:
Network:
The setup was not as straight forward as I had hoped for. Connecting to my home wi-fi proved to be challenging due to firewall rules on the router and the fact that the hotspot only supports 2.4 GHz wireless networks (802.11 b/g/n). Once I plugged it in via Ethernet (micro-USB port 2 to the left in the image below), I was able to login to the dashboard using http://pi-star.local.

Software:
The steps to configure the Raspberry Pi for the DMR network also were challenging since the instructions did not exactly match what I was seeing under “Configuration” on the Raspberry Pi dashboard. Here are the steps I took to setup DMR to work with my BTECH DMR-6X2 Pro Walkie Talkie.
Go to https://radioid.net/ and create an account and DMR ID. I had to send their support my FCC license due to a recent upgrade to a vanity call-sign.
Go to https://brandmeister.network/, create an account, and then go to self-care and create a password. You will need this password when setting up DMR on the Raspberry Pi. Make sure your password does not have any special characters.
Login to your Raspberry Pi using the default username “pi-star” and password “raspberry”. (Note: You should change the default password at some point.)
Select “Configuration”.=
Select “Simplex Mode” and click on “Apply Changes” Note: You have to click “Apply Changes” for each section when you make changes/updates, then go back to the “Configuration” page.)
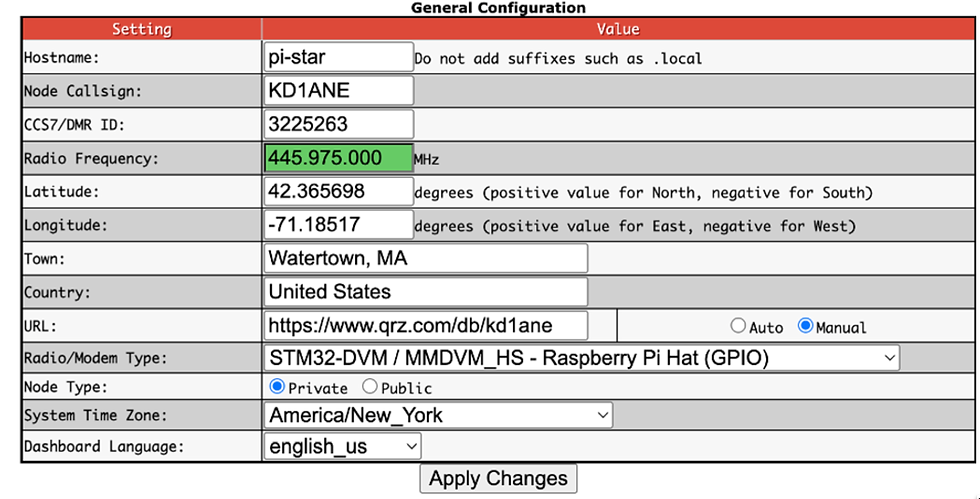
Enter your call-sign, DMR ID, the Simplex radio frequency you selected, Latitude/Longitude, your town, and the URL of your QRZ page. (Note: Your Simplex frequency must match in your radio code plug, or it will not work.) Click on “Apply Changes”.
Select the correct DMT Master for your area of the country. I searched in Google and the instructions pointed me to “BM_3103_United_States. The instructions also state this is where you enter the password you setup on BrandMeister; however, that was incorrect for my version of the Raspberry Pi software. I cover this in the next step.
To enter the password you setup on BrandMeister from the “Configuration” screen, click on “Expert” at the top of the screen, and then click on “Full Edit: DMR GW”. There are 3 DMR networks, so to be safe, I entered the password I created on BrandMeister for all 3 and clicked on “Apply Changes”.



Building Your Code Plug & Testing:
Create a new frequency for your hot spot. Mine is called “Pi-Star-Simplex”.
Make sure the frequency on your hotspot matches your simplex frequency on your radio. I did a Google search for New England and found that this range is suggested: 441.000 MHz or 446.500 MHz
Set your wattage to low power. (I have my hotspot in another room as not to overpower the receiver.)
On the BTECH DMR Pro, set Digi Monitoring to Double Slot. You can do this by pressing the button below the microphone transmit until it shows Double Slot.
You can switch Talk Groups by clicking on “List” to switch. Don’t forget to click “Select” when you change Talk Groups.
Test your configuration using the Echo Test service (9990). Any test made should be played back once you unkey the mic. Check your Raspberry Pi dashboard; you should see green if it is working properly.
If you are not getting a reply from the test service (9990), or you are not seeing green on the Raspberry Pi dashboard, check the BrandMeister logs under "logs" to ensue you have the correct password setup on both sides. You can also download logs from the Raspberry Pi that may help you in finding the problem. In my case, I did not have the password setup properly in the Raspberry Pi in the correct spot. That’s when I found the “Expert” configuration screen on the Raspberry Pi. Once I found the correct spot to enter the BrandMeister password the connection worked.
Once you have confirmed the radio is working, select a talk group (Example: 3100 for US) and key up the mic. You may have to quickly kerchunk a few times for the network to sync before transmitting your call-sign.

Comments